The full guide: Best golf simulator projectors
The Garmin Approach R50 is a launch monitor and a golf simulator in one unit: three high-speed cameras, a 10 in color touchscreen and Garmin's Home Tee Hero course play, with an HDMI port for a TV or projector. Jay Lasco, host of Golf Simulator Videos, unboxed it in January 2026, set it up in the GSV studio, connected it to a projector and hit his first shots on the range and at TPC Sawgrass. This post covers what comes in the box, how to set it up, the settings worth knowing, the size of the hitting area with and without club data, and what GSV saw on the first shots. The full R50 review, with the room it needs and what it costs to run, is on the Garmin R50 review page.
- $4,999.99At Shop Indoor Golf, $4,750.00 at checkout with GSV5OFF
- 10 inColor touchscreen on the unit
- 1 ft 6 inTo the side of the tee, by Garmin's manual
- 3High-speed cameras, no marked balls
- 4 hoursOf battery, by the listed specs
- HDMIOut to a TV or projector
GSV's code GSV5OFF takes 5% off a first order at Shop Indoor Golf: at a GSV checkout on October 9, 2026 an R50 came to $4,750.00.
Garmin R50 at Shop Indoor Golf
- Garmin Approach R505% off at Shop Indoor Golf with code GSV5OFF.First-time buyers only, one use. Not valid on a standalone Trackman, the Square Golf launch monitor or the ProTee VX.
Will it fit? Check the Garmin R50 fits your room in the free GSV Sim Builder, in 3D.
Buying through GSV's links and codes helps support the channel: GSV earns a small commission at no extra cost to you, and you still get every saving available.
What comes in the box
- The R50, which weighs 9 lb by the listed specs. It is big for a launch monitor because the 10 in screen and the computer that runs Home Tee Hero are built in.
- A carrying case with a shoulder strap, lined in a soft, suede-like material, so the unit can go from the simulator to the range.
- The AC adapter and power cord.
- 250 club tracking stickers, larger than most club stickers, one per club for club data.
The R50 is made for indoors and outdoors. A sliding door on the back covers the ports, so keep it closed at the range if there is rain or dew around.
The ports, the battery and the hidden extras
| What | What it does |
|---|---|
| USB-C | Updates through Garmin Express on a computer. It does not charge the unit. |
| Round power port | Charging, with the included AC adapter |
| HDMI | Out to a TV or projector, up to 1080p |
| Wi-Fi | Updates and course downloads with no computer needed, and the official GSPro connection (GSPro runs on a Windows PC) |
| Bluetooth | Plays the R50's sounds through a Bluetooth speaker |
| Battery | Up to 4 hours |
| Barometer | Built in, so carry distances account for your elevation |
The Bluetooth speaker connection and the barometer are two extras Jay calls hidden, which few owners seem to know about. GSV's studio sits at about 800 ft; the elevation is also set at the start of each session, along with the humidity and temperature.
The data it reads
Ball data, with any golf ball: ball speed, launch angle, launch direction, spin rate, spin axis and apex height. Garmin suggests turning the logo on the ball toward the unit, which likely gives the cameras something with contrast to track, but it is not required.
Club data, with one sticker on the top middle of the club face: club speed, club path, angle of attack and face angle. Units that read face angle usually need more than one dot, so how the R50 gets face angle from a single sticker is one of the things GSV is testing in its ongoing R50 coverage.
Setting it up
- Switch the R50 on and follow the welcome screens.
- Connect it to your Wi-Fi.
- Sign in to your Garmin account, or create one. The touchscreen is quick and responsive through all of this.
- Let it update. GSV's unit downloaded a software and firmware update over Wi-Fi quickly, without Garmin Express.
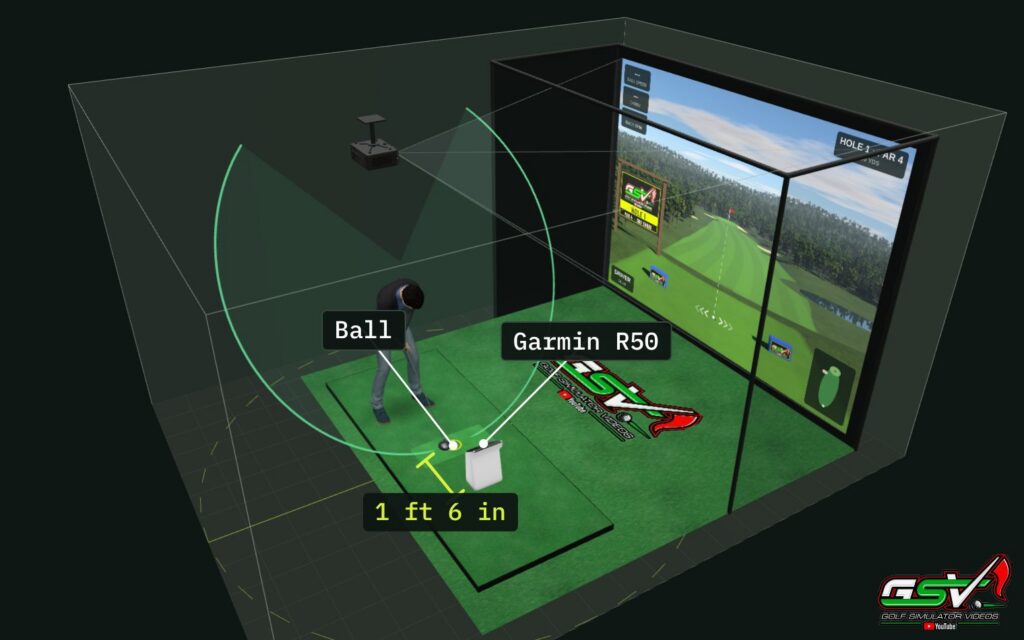
- Place it about 1 ft 6 in to the side of the tee, facing it, by Garmin's manual.
- Start a session and set the conditions: elevation, humidity and temperature.
Aiming. The R50 has a target alignment: set down two balls, then set the target, 5 or 10 degrees left, for example. GSV's tip, for this unit or any other: skip it, and aim the unit straight at the target with an alignment stick. In Jay's experience, that leaves the unit facing the angle it needs.
Your profile. A picture uploaded to your Garmin account, on a computer, shows on the R50. The device owner can add and edit users, and set up a bag.
The settings worth knowing
- Display and brightness: light and dark themes, and adaptive brightness that dims the screen in a dark simulator and brightens it in the sun.
- Text size: larger text for easier reading.
- External display: mirror the R50's screen or not, and the format for the TV or projector: 4:3, 16:10 or 1080p. Set the format before a session, because it cannot be changed during one. Mirroring can be switched on and off during a session.
- Center line offset: for a room where the golfer is not in the middle of the screen, for right- and left-handed golfers.
- Storage: downloaded courses and saved impact videos can be deleted here. GSV's unit had used 8% after the first courses.
- Battery: a battery percentage display and a power saver mode.
Connecting a projector or TV
GSV ran an HDMI cable from the R50 to its projector, a WUXGA model at 1,920 x 1,200. The R50 sent 1,680 x 1,050 in the 16:10 format, and the projector upscaled it well. On a big screen the picture is softer than on the R50's own crisp 10 in screen, with some pixelation when it is blown up large. Two ways to get the most from it:
- Use the 1080p output with a 1080p projector or TV, so nothing is stretched.
- Keep the picture a little smaller on the screen.
Two more things to know. With mirroring on, the external display sleeps until something happens on the R50. With mirroring off, the projector shows the course or range full screen and the R50 becomes the control screen, showing the map, the data or the impact video. Views can also be split side by side: the range in the middle and the impact video beside it, for example. The golf simulator projector guide covers resolution and throw for every screen size.
The hitting area, with and without club data
The R50 shows its hitting area on the screen, and its size depends on the tracking mode:
| Tracking mode | Front to back | Side to side |
|---|---|---|
| Ball data only | At least 10 in, by Jay's check | Nearly the width of GSV's hitting mat |
| Ball and club data | About 4 in, by GSV's marks | The same |
| Putting | The ball-only size, chosen by itself | The same |
Club data takes the back of the hitting area away, so with club data on, set the ball carefully. One more lesson from the video: a white glove near the ball kept the unit from locking on. Jay's advice: use black or green tees rather than white ones with camera-based simulators.
Practice, play and on-course practice
- Practice: a distance range, and the Crooked Creek, Green Valley and Island ranges.
- Play: Home Tee Hero course play, with 43,000+ courses, weekly tournaments, and on-course practice, new in Garmin's 2026 Home Tee Hero update. Courses can be found nearby, by recently played or downloaded, or by search. In January 2026, Jay estimated, about a dozen courses were in Garmin's enhanced versions, with more being added.
- Views: the map, the overhead view, ball impact data and the impact video, alone or split side by side. The impact video plays down to quarter speed.
- Shot tags: a feedback button tags a shot with a note, such as a new club or a good or bad swing.
The first shots
- A draw with club data. Club path 13.8 degrees right, the face 4.7 degrees right of the target, so 9.1 degrees closed to the path: the numbers of a shot from the inside with the face closed to the path. The impact video showed the strike a touch heavy.
- The 17th at TPC Sawgrass in on-course practice, from the blue tees with the ball moved back a little: a soft 9 iron came off just right. Moving the ball takes a tap on the hand icon and a drag.
- A chip from the pot bunker, about 30 ft, with the lie taking 20% of the power. The chipping played nice and soft, and worked well.
- Putting, 12 ft with a big break at a stimp of 11. The aim is set right in the simulation. The first putt was too firm and lipped out downhill; the second, softer, went in. For putting the R50 uses the large ball-only hitting area by itself.
Two notes for Garmin from the first session: controlling on-course practice felt easier with mirroring on than with it off, and one putt showed a lie penalty that did not belong, which may have come from switching the display settings mid-hole.
Home Tee Hero, the membership and GSPro
Home Tee Hero runs on the R50's own screen, so no gaming PC or tablet is needed to play courses. It needs an active Garmin Golf membership, which Garmin's app lists at $9.99 a month or $99.99 a year. Without a membership, the range and the data still work. The R50 also connects to third-party software: GSPro officially, over its built-in Wi-Fi, with E6 Connect and Awesome Golf listed by Shop Indoor Golf. GSPro is separate paid software, $250 a year from GSPro, and runs on a Windows gaming PC. The Garmin R50 review page sets out the first year's cost with the membership and with GSPro.
GSV's take
Many GSV viewers have asked about the R50, and in Jay's view the reason is the all-in-one design: set it down, and with nothing else, play golf on its screen, or run it to a projector for a full simulator. At $4,999.99 it is a big step up from an R10, but the computer and the screen that a simulator would otherwise need are inside it. The touchscreen is responsive, the menus are deep, the impact video is crisp, and chipping and putting worked well from the first session. GSV has more R50 coverage on the channel: driver on GSPro, chipping and putting, and nine holes of Home Tee Hero.
Where to buy and codes
The R50 is $4,999.99 at Shop Indoor Golf, where GSV's code GSV5OFF takes 5% off a first order: $4,750.00 at a GSV checkout on October 9, 2026. The Garmin discount code page has the steps and the terms.
5% off at Shop Indoor Golf
First-time buyers only, one use. Not valid on a standalone Trackman, the Square Golf launch monitor or the ProTee VX.
Code last checked October 9, 2026.
Free consultation with GSV's partner builders
Building a simulator around an R50? Jay works with official partners: master builders he hand-picked, who get on a call quickly and make sure the screen, the projector and the room fit before you buy anything. They offer package deals on the whole build, DIY packages to put together yourself, full installation, and more. The consultation is free.
Garmin R50 setup questions
How do you set up a Garmin R50?
Switch it on, connect it to Wi-Fi, sign in to a Garmin account and let it update. Place it about 1 ft 6 in to the side of the tee, facing it, by Garmin's manual, then set the elevation, humidity and temperature when starting a session. GSV aims the unit straight at the target with an alignment stick.
How far from the ball does the Garmin R50 go?
About 1 ft 6 in to the side of the tee, facing it, by Garmin's manual. It sits beside the ball, so it adds no depth to the room.
How big is the Garmin R50 hitting area?
In GSV's test, at least 10 in front to back with ball data only and about 4 in with club data on, and nearly the width of a hitting mat either way. Putting uses the larger ball-only area by itself.
Can the Garmin R50 connect to a projector?
Yes, with an HDMI cable. It outputs up to 1080p, in the 4:3, 16:10 or 1080p format, chosen before a session. It can mirror its own screen or show the course full screen on the projector while the R50 becomes the control screen.
Does the Garmin R50 need special balls or stickers?
No marked balls are needed for ball data. For club data, one of the included stickers goes on the top middle of the club face. Garmin suggests turning the logo on the ball toward the unit, but it is not required.
Does the Garmin R50 need a subscription?
The range and the data work without one. Home Tee Hero course play needs an active Garmin Golf membership, which Garmin's app lists at $9.99 a month or $99.99 a year. GSPro is separate software, $250 a year from GSPro.
How long does the Garmin R50 battery last?
Up to 4 hours, by the listed specs. It charges through the round power port with the included adapter, not through the USB-C port, which is for updates.
Is there a Garmin R50 discount code?
Yes. GSV's code GSV5OFF takes 5% off a first order at Shop Indoor Golf: at a GSV checkout on October 9, 2026 an R50 came from $4,999.99 to $4,750.00.
Is there free help planning an R50 simulator?
Yes. Jay offers a free consultation with GSV's partner master builders, hand-picked by Jay, who get on a call quickly and make sure everything fits. They offer package deals, DIY packages, full installation and more. Use the free consultation button on this page.
More Garmin on GSV
Full video transcript
This is the Garmin Approach R50 portable golf launch monitor. And not just any golf launch monitor, an all-in-one golf launch monitor with a golf simulator hardware and software built into it. So, very unique device. And I'm going to do a full unboxing and review talking about all the specifications and features. I'm even going to point out some things that even if you're a current Garmin Approach R50 owner, you might not know about. So, stay tuned. But let's just start by unboxing this. And I will say I've had so many people asking to see this since it was released. So, I apologize we didn't get it, you know, featured uh earlier, but it's here and we're going to fully cover it. We're going to be doing ongoing coverage. Um, making sure that we're keeping you guys all up to date. I'm sure that you probably saw my videos from the 2026 PGA show. I was at the Garmin booth. We talked about their new Home Tee Hero update. I'm excited to show you guys that update to their more enhanced courses and we'll actually do that because we're going to hit shots on this device here shortly. First thing first, I do want to just talk about how the unit arrives. Uh very well boxed um easy uh you obviously uh to unbox because it comes in this really cool almost like I want to say cooler carrying case. Um, so it does have a shoulder strap, but the interesting part about this unit, I mean, there's so many interesting things about it, but it's an indoor-outdoor unit. So, you can use it inside your golf simulator. You can use it on real grass. So, that stands it apart. But this case, as well as the unit actually has a waterproof rating. So, very unique to this device. Um, I think that that's really cool. the inside of this case. I'm feeling right away um quality material. And I just I always want to point that out. So, check that out. It's almost like a a felt suede material. See how you can see that pattern on there? Um I appreciate nice cases and especially if you're going to be using this in your golf simulator, but also out at the range because of those capabilities. You have a really nice case included so you can do all that. Now, first thing first, as we're talking about the unit itself, it's huge. I mean, it is a big unit, but it only weighs 9 lbs is what was stated. So, I don't think that's a big deal. It the reason that it's big is because the stand apart feature is this built-in 10in color display. Now, the resolution is 800 by and I have a note on this. I don't want to misspeak. Um, the resolution I believe is 1280 by 800. So, that's a 16x10 format. And we have a lot to dive into to talk about there because this has an HDMI out that allows you to either connect to a TV which can go up to 1080p, you could connect it to a projector. I'm going to show all that here in action here shortly too when we're hitting shots. So stay tuned. But let's just talk really quick about, you know, the hardware itself. Three high-speed cameras. I believe they are using infrared. I couldn't find anything stated specifically that they are, but I think they are. It does not require marked balls. It gives you all kinds of measured ball data and club data. And the club data only requires one kind of larger uh reflective circle right in the top middle of the club. I'll show you once we get that all unpacked and uh you know what it looks like. So, let's go ahead and spin the unit around really quick. Um just so you can understand how this works back here. This is kind of like a sliding door. So, you can open this up. That way you can access the USBC, the HDMI, and then also you can see the little circle power plug. Um, so you want to keep that closed if you're out on the range. Um, and it happens to be raining, you know, dew, whatever it may be. Um, that way it can have that full waterproof rating. Um, it's kind of wild. It says it can like resist water up to like 60°. I don't know exactly what that means. I'd like to kind of track that down. So, um, other things that I do want to share before we get this thing set up and I show it all in action. So, the USBC that you saw on the back, that's actually for connecting to Garmin Express for updates. All right. It also has built-in Wi-Fi. It can do all the downloading and everything right off of Wi-Fi. The HDMI out, that's specifically for connecting those, you know, third monitors. What's really cool about this, and I'm actually going to give you guys kind of like a zoomed-in view of this screen when we're actually uh connecting everything and setting it up, and I'll show you the menus, is that the capabilities it has once you're connecting in that third monitor, such as changing format. So, you can select 4x3 or 16x10, or you can do the uh 1920x 1080 because it has 1080p function. So, even though this is 16x10, you could have it up on a TV that's 1080p. So, pretty cool. Um, let's go over a couple other things really quick. So, uh, placement of the unit is a foot and a half or 1.5 feet. So, not exactly a foot and a half, but 1.5 ft, uh, away from the ball. And that's going to give you a hitting area that they depict on the screen. I'd like to kind of measure it. I'll show you guys exactly what it looks like. A lot of people are kind of telling me that it's like 8 in by 8 in or so, but it's not a perfect rectangle or square. So, we're going to get you that exact measurement here. So, um, other things that you want to, uh, just know about is that because it has those three high-speed cameras, there's really no restriction to the space that you need to be in, you need to be able to safely swing, right? So, I always tell people, make sure you're in a safe environment. But because it's measuring it in such a short distance, basically, if you can swing safe, it's going to be able to measure the ball and you're going to have no issues. Um, as far as uh, data metrics go, full measured ball speed, launch angle, launch direction, the spin axis, and spin rate, um, and apex height. I do love that they're getting all of those metrics with ball of choice. I did read somewhere in the documentation kind of like way deep in that they kind of like recommend uh placing the logo towards the unit and I'm sure that's so the camera can lock onto something you know with heavier contrast and be able to measure those spin metrics um launch angles all that type of stuff. So something that we'll pay attention to. Um but I think that overall it you know can measure the ball without you know you have to worry about um you know putting the logo at it. So, we'll do some testing and I'll let you guys know how that works. Um, club data, club speed, uh, path, angle of attack, and face angle. Now, I couldn't find anywhere that it said it was actually measuring the face angle because comparable units, you know, that do give you face angle have usually more than one dot. Now, there's so much technology that's being released on this. Whether it be AI depiction, being able to see the club just by locking into the one sticker, are they using some type of calculation, I don't know. We're going to put it to the test though, so stay tuned for all that ongoing coverage. I think it's really cool that you get face angle. You know, we'll we'll go ahead and touch on the price. Right now, at the $4,999 price, yes, it's getting to be a more expensive unit, but we're talking about all-in-one. So, this has both the computer inside of it to run the Home Tee Hero software that they have um and the screen. So, you know, a lot of people when you're going out and you're going to use gaming software, even if it's just an iPad and an iPad app, you know, an iPad can cost you a,000 to $2,000 depending on what kind of software you're running and what you need, you know, chipwise. Um, gaming computers, they can cost $2,000 plus dollars depending on resolution, everything you're running. So, you do have to kind of take that in consideration for the price of the $4,999. Now, the software does have a subscription to it. If you're going to use the Home Tee Hero software, it's like $9.99 a month. So, just $9.99. I think that that's really fair for 43,000 courses that they're putting more work into. I mean, that latest video that I did showing Augusta National, I mean, uh, that's really cool. And it looks like it's just improving and they're focused on it. So, it's cool. They have that subscription base and they're able to reinvest and there's new things coming. So, that's cool. Um, let's talk about a couple other things really quick. So, uh, it does have a hidden feature that I don't think many people have talked about. Has a built-in barometer. So, what's nice about that is is whether you be in the mountains or you're, you know, near sea level, I'm only at about 800 feet. You know that it's going to take that consideration for its algorithm to give you that carry. All right. So, it's really nice. Has that. Now, built-in battery on it is up to 4 hours. So, lots of life there. I think 4 hours is just plenty. Um, you know, and if you're playing with some friends or whatever and you know, you're dragging on a long round, um, just go ahead and plug it in. It's no big deal. But if you're going to the range or whatever, I highly doubt you're going to be at the range for more than four hours. So, um, all kinds of, uh, good things to talk about as far as the specs go and, you know, bang for the buck that you're getting with the unit. The the my personal opinion, I think the reason that so many people reach out that ask about this unit is the all-in-one feature. If you are someone that is looking just for buying a unit and being able to set it down and play some golf, you can do that. And you can also not subscribe to the software and still get the data metrics and I believe basic range. I want to I want to test that, but I believe you get the basic range and data metrics and everything with no subscription. But if you want to play the golf and just have it all-in-one, no gaming computer or anything else, very simple setup, you can do that. You just set it down. You don't even need the external monitor. You can just look right on the screen. So, I think it's cool that it's opening that up. It's really opening up a lot of doors. It does have third-party software integration as well. So whether it be E6, whether it be Awesome Golf or the very popular GSPro, we will eventually show it with all of that. So stay tuned for future videos as we do more coverage on this. And oh, as always, you know, comment below what you want to see now that we have one of these in the studio. You bet that we're going to be covering all the updates and everything else and doing user request videos. So right now, what I want to do is get it all set up. I'll get logged in and everything. We'll connect it to my projector. I'll show you guys how this works. Let's go. All right, guys. So, we have our Garmin Approach R50 all connected and ready to go. And I wanted to go over just kind of what that process looked like really quick. So, you turn the unit on. You kind of get a welcome screen. You get started. Uh you're going to want to connect to your internet. And then you're going to log into your Garmin account. If you don't have one, then go ahead and create one. The very first thing I noticed is is that it's very responsive touchscreen. So, it's easy to use. Um, you know, I was wondering about that when I was talking about the touchscreen, but you're just going to go through some settings, get things all set up, and once you're through that, you're ready to go. I was hitting some shots. Now, I do want to tell you guys about a couple things. Uh, one, I mentioned the club stickers. So, let's go ahead and just show those on the camera really quick. So, the interesting part about these, you'll notice, is that they're just larger in format. So, when I show it on the club versus most club stickers you've probably seen me show in the channel before, they're just larger. So, and maybe that's how they're getting a better depiction and getting that face angle that I'm so interested in. Um, but now before we get started, before we start hitting shots, let's just take you through the screen really quick. Now, you'll notice it says approach R50 up there, and that's because I ran an HDMI cable um up to my projector. Now, that is a WUXGA projector. So, that would be 1920 by 1200. And this only has a 1080p out. So, when I record it, I think I'm going to shrink it down just a little bit for you guys because you don't want to stretch um you know, an image to where it's going to, you know, look look worse than it really is showing on screen. So, I'll make sure that I have that appropriately done. Um but I noticed that when you're duplicating the image, it kind of goes into like a like a sleep mode. So, it's not mirroring exactly what's on there until you're actually doing something. So, what I'm going to do is I'm going to go ahead and hit record. And now what I'll do is I'll just kind of bring you guys through the menu really quick on what I see. So, you have a practice mode. If you go into practice mode, you can go to a distance range along with Crooked Creek, Green Valley, Island Range. So, all kinds of options. I'll make sure I show all those off obviously. Um, and then if you go into the play mode, Home Tee Hero, where you can go out and play on the courses, weekly tournaments, and then here's this new one that's so cool. So, this is on-course practice. And this is what I'm going to actually uh, you know, show you guys in action here in just a minute. Now, nearby, check this out. So, it automatically defaults or you can do your recently played or downloaded. You can see I was testing things out there. And then, of course, you can just go search. Um, I mean, 43,000 courses. I think the list of enhanced courses right now is probably around a dozen or so and they're adding more. So, just understand that that how that works. Now, down in the lower left, you'll see the little GSV logo. I uploaded that in my Garmin account. You can actually log in just through a desktop if you want to do that. Um, I'm the device owner. You can add users. You can edit users. You can go into settings. That's where I connected to my Wi-Fi. Uh, Wi-Fi connection is great. You can see it's fully solid here. Um, and I was able to download and update the unit really quickly. So, it did like a full software download, firmware download. You don't have to use the Garmin Express uh connecting with the USBC. I did want to verify uh, you know, right now to let everyone know that USBC is not for charging. You're going to want to use the included AC adapter to go through the circle port for charging, but you have four hours once you do that. Now, Bluetooth is the little hidden secret. So, it's searching for a Bluetooth uh Bluetooth device right now. If you have a Bluetooth speaker, it will connect to the speaker and play the sounds from the device through the speaker. So, if you just wanted to be playing just through this, and you wanted sounds, you can do that with a Bluetooth speaker. I thought that was really cool. It's kind of like a little hidden secret. A lot of people didn't know about display and brightness. It is nice that it gives you both themes, both light and dark. You can change the the brightness of the actual unit. It can actually do adaptive brightness, so if you have a darker environment, it's going to go ahead and dim it down. If you're out in the sunlight, it's going to bring it up. It's really cool. Text size is something that I actually really like. Listen, guys, everyone doesn't have, you know, 2020 vision, so you can increase the text size so it's easier to navigate. Now, external display is the one I was talking about. I have it on mirror right now. You do have to set this to either mirror or not mirror. Um, and then select your format right here before you go out. You just can't select format. But that's the formatting I was talking about. You can actually turn off the duplicate display and turn it on once you're out practicing. You just can't do your aspect ratio. So, make sure you do that ahead of time. So, you can see it outputs 1680x 1050. My projector's actually 1920 x 1200. Now, it's doing a good job of upscaling that based on my testing. So, we'll go ahead and hit save. And then you can do center line offset. So, if you're in an offset environment, you know, where you're not centered down your screen, you can do that for both right and left-handed players, too. So, nice that they have that. um language and input obviously pretty straightforward to battery and power just going to show you that 23% um until fully charged. Uh battery percentage or that actually like percentage. I'm going to change that right now. And then it does have a power saver mode where it's going to barely use any power. It's going to go into a power saver mode if you haven't used it. Um battery saver uh is on. And then language and input uh English all kinds of different languages um that you can select date and time. Now, mine set automatically when I connected to Wi-Fi. That was great. Um, you can use local default. You can also do 24-hour time if you want. And then device registration. Mine's all registered. Device passcode. I skipped over that in the settings. You probably saw in the little pre-roll that I had there. Now, this is one that I wanted to point out, too. Once you've downloaded courses and you want to delete them, this is where you'll do that under settings. So, you would just select a course. Uh, you'd hit edit, select a course, and then hit delete. So, that is how you delete courses. um if you don't want them on here any longer um you might be completely full. Let's go under storage and see what I've used so far. I've used 8%. So I have plenty of storage left. You can see these courses um you know 04 and if you're saving impact videos um you can go in here and delete your impact videos as well. So I actually think that you do not need a subscription to store your shots which is pretty cool. Kind of a little fun fact there. You can do a factory reset. It's going to be about legal and help and support. We're really not going to go into that. Um, so other than that, um, I'm gonna go ahead and stop that recording. Let me go ahead and get this set up just for optimal, um, you know, viewing for you guys and we'll hit some shots. All right. So, now I think I have everything set up that way you guys have the best viewing, uh, you know, opportunity based on what I'm doing. So, what I'm going to do is I'm going to start with practice. So, when we go into practice, obviously, like I showed before, there's all these different things. I'm going to go into distance range. It's going to allow me to select my tracking mode, whether it's ball data uh or ball and club data. And I will point out right now, and I'll show you guys here in action in a second, that the club data definitely gets a lot smaller of a hitting zone. So, I will demonstrate that my target alignment is set to default. It does have a target alignment available where you set down two balls and then basically it's going to uh allow you to set your target whether it be, you know, 5 degrees left or 10 degrees left. Personally, I will give you my tip. Whenever I'm using a device like this, it doesn't matter what it is, the alignment rods and everything. I actually don't use them. All right? I just simply aim the device right at my target. You can do that with an alignment stick and it just makes it a lot easier. I feel like it's better because then you're facing the unit on the angle that it needs to be. Um, that's my personal preference, but it does have target alignment available. I set my elevation to my local elevation. um relative humidity uh temperature I think is what is that uh 74 and then we're going to hit start session and you'll see that the screen is going to activate once I select my club see it just once you get going in the software it kind of wakes up the external display so here we are now this is cool that I'm recording this so you guys can see how all of this works inside so you have your carry distance and shots over on the left right now if I press that little uh box, not in the very lower left, but the box right next to it. That's how you make it full screen. All right, so you could either have those shots on the left or not. Now, if I go over to the lower right, I can hit that setting button. And now, this is where it gets really powerful. So, um, I'm controlling the R50 display. If for any reason I did not want to mirror at any time, I can do that. Like I said, you just can't change the aspect ratio. I'll show you how that works in a second. But here is where you're going to select whatever view setting you want. All right? Whether it be the map, the overhead view, um ball impact or anything. So, um if we just select the map and you can see you have shot dead and everything else. But let's say I want to split this screen into another screen, you can do that. And then you can have separate data over there. So, it could be like um ball impact or impact video on the right and then a range in the middle. I mean, it's just a lot of stuff going on. So, let's just go ahead and take a shot with all those split screens and you guys can see what this looks like. Little thin. Just kind of making a first shot of the day. And you can see there I got my impact replaying over on the right. What a great image. When you're looking on the device that has the proper resolution and it's smaller, it's a very crisp image. As you could see when I was recording the screen, once you take a lower resolution and blow it up really large, it is going to have a little bit of pixelation going on. I have it slightly enlarged on that screen. So, that's not the same quality that I'm seeing on the device. I want to make sure you guys understand that. So, if I were to take the max resolution um of that the the screen that that's outputting, it goes up to 1080p. So, I could have a 16 by9 1080p image up there. Or you could step it down and do 12,200 by 800, a WX uh XGA or is it just WGA I think is what it is. Um you can buy a very inexpensive projector and then do a smaller size and it's going to be more crisp. So a lot going on there. I just wanted to unpack it for you guys a little bit. Um but what's really cool is is just the options that you get in here. So you can actually slow this down if you want to to 0.25 and show that impact. Yes, it probably sees my shoes. Uh, thinks that I'm moving a ball around, but I'm not. Um, I'm going to go to settings really quick and view settings, and we'll go to ball impact. So, you guys can see that. Now, what does that show you? That shows you all kinds of stuff. Now, I don't have club data on yet, so you're not going to see face to path or launch direction. Actually going to hit done so you can see that. Um, but that's where all that data would show up. And I'm going to turn on club data here to show you the difference in the hitting zone here in just a second. But, wow, is there a lot going on here. I mean, there's just so much you can do. So, I could go to view settings here, and I could do overhead view. So, there's the overhead view. I could go to settings, and I could do more data fields. I could do the ball impact or the ball impact video. All right. So, just tons of different settings on here. Now, once I'm inside of here, uh, and I go into my normal settings, and I go to session settings, I can change tracking mode to ball and club in the range mode, but I think on On-course Practice, you're not able to. So, let's go ahead and demonstrate the hitting size really quick. You guys have a good view of my camera, and you will see how much smaller it just got. So, the width of it is pretty nice. It just locked in. It's almost to the edge of my hitting mat. Now I'm gonna push it all the way over. And you can see now I'm almost at the other edge of my hitting mat. Widthwise plenty when you're doing club. But once you switch to club, you're going to notice that you only have probably a couple inches behind and then a couple inches in front. Four inches or so is kind of what I'm seeing. I'll even make a mark where this is right now. And then where that is right here. I'm gonna guess that's about fourish inch inches. So, um, you know, understand that it really does go down a lot. Now, let's do this. Let's put it right in the center. And let's just take one more little shot so you guys can see. Now, what am I going to, you know, let's let's hit like a draw because that was kind of a a cut. So, we're going to have this coming from the inside. Hopefully, I snapped that face enough. I did. Perfect. And then, look at that. Face the path. 9.1 left. I was club path 13.8. You saw me come in from the right and then I got that face 4.7. Closed it enough to give myself a draw. And now if I wanted to, I could go down here. I could hit settings, view settings, um, impact video. And it'd be pretty cool to see that club coming in that far from the inside just for verification purposes. So you can see the logo on the ball. You can kind of almost see spin verification on what's going on. Um, having an impact video as clear as it is on here is pretty cool for reference. So, really nice. Actually, looks like I caught that just a little bit heavy before the ball. All right, so now what do we want to do? So, you can see my my shots over on the left that are going on. Um, this little feedback button, you can tag shots and put notes in there. So, if you're working on your game, you can say, um, hey, I was using that new club. You could I mean you can tag shots any way you want. Good shot, bad shot. Um just so many details to all of this. Now, if I go on the hamburger in the lower left, um I can go down and I can end my session. Uh let's go ahead and delete it. We don't need to save it. Don't need to take up the room. Um you can set up your bag. And then now what we're going to do is let's go ahead and go out and hit some shots out on the course. So we're going to go to play. I'm going to go to on-course practice. And I still have club data on, I think. And the only thing that I should do for you guys is I should show you, you saw the hitting zone, but I actually want to, and I'll do this, I'll just start this in the ball mode only, and that way you guys can uh see the size of of the ball uh ball only because it does get a lot bigger. So downloaded. Um, why don't we Man, I haven't shown Wolf Wolf Creek in Adrian, Michigan. Oh, I thought that was the Wolf Creek that was out in Las Vegas. So, I'll have to double check. I was downloading some different ones, but you know what we'll do? Um, TPC Sawgrass. I mean, everybody kind of knows that one. Um, we'll play from the blues. We'll go to next. Putting on. Gimme six, green speed 11. Live penalties on. Uh, tracking mode. I'll switch to ball data only and then we'll go to start playing. All right, it's going to load up. Say Home Tee Hero. Now it's mirroring. And then I do have to show you guys what it looks like when it's not mirrored. Essentially, what it does is just takes this whole screen and just takes everything away. So in and then what you can do down here is you could have maybe just your impact video only. You could have your data, anything along those lines. But what I do like about mirroring on the latest Home Tee Hero update when you're doing on-course practice is it seems like it's more controllable and that's some feedback I have to give them. When you're not mirroring it seems like it's almost a little more difficult to control. So just some feedback brand new you know we need to share with them. So hit the cart. Um let's go to famous number 17. Excuse me. Lots of talking and uh you know kind of going on the fly. There it is. famous number 17. Now, that's only 133 yards. And what did I stick her up? I It was a nine iron. So, I think that what I'll do is hit the little hand and we'll just kind of drag this ball back a little further somewhere right there. Look how easy it is to adjust that. I do like how easy that is. Hit your target again. And now you're set up. So, now you guys are going to get an idea of what an enhanced course looks like. The interesting part is, keep in mind the resolution part that I pointed out to you. Like on here, it looks like it looked on my iPhone when I was first testing it. When I blow that image up a little bit, I'm getting a little bit of pixelation. So, it's something I might want to keep in mind. Maybe I was better off doing a 1080p projector, you know, maximizing the resolution or doing, like I said, W uh WGA, I believe, the the 1200 by 800. um you know and not stretching it as big. So, let's go ahead and just try to hit a little soft nine iron down there. After I do that, I'm going to show you guys. Oh man, that was really good. Holy moly, that was fantastic. Little little soft nine iron was the way to go, wasn't it? Now, what I want to do is show you guys the practice area. What's incredible is there's just so much to this unit. I feel like this is a marathon, but I don't want to skip anything, you know, and but I promise you guys, we're going to go through so much with this. I'm going to play GSPro and we're going to show awesome golf, you know, all the all the third party software. Um, but I just wanted to dive in in a first look review so if someone's shopping for this unit, they can see what they get kind of pulled out of the box. All right. So, um, let's go ahead and test this hitting area ball only. So, I'm going to put this into the front corner. So, there it is right there. I'll just kind of put my finger right where that is. And then, so the width is going to be the same. So, all it's doing is is chopping off the back kind of triangle when you're going to ball only. So, I'm just going to kind of move the ball this way. And you can see it's actually like 10 in, you know, easily 10 in. kind of get it in its right spot. Come on, lock on. Is my glove messing with it? Yes. White gloves messing with it. There's a little side note for you. Don't use white T's with any golf simulator ever. Um, use black ones. You can use green ones, too. Just use black ones. Um, and but you can just see how much bigger the hitting area is, you know, just just much bigger. Now, what I do want to do really quick is I want to test chipping and putting before we stop. So, let's go ahead and go up and let's say that we were in the pot bunker. Oh my gosh, could you imagine? I mean, that would not be fun. Um, but now I'm losing 20% power. And what do I have? I have a little 30 foot chip. I mean, this is What did I do? I gave myself like the impossible chip. I I I really do like the resolution of this screen. For 10 in, all you need is 1200 by 800. think you guys just should be really impressed. I hope that um you know I was able to show that off. Why don't I do this? I'll actually take my video one more time to show the quality of this screen real quick. We'll just hit record really quick and that will kind of show you guys the quality that I'm seeing on the screen. All right. So, I can even put my hand in there so you know that that's what you're looking at. Um that's what I'm seeing on screen. All right. So you have a good idea of the graphics. And if you want, I could probably chip that with movement. So let's keep it going for a second. 30 ft. Oh, that was like almost like a Oh, you know what? It's not going to do it, guys. I got my my tripod uh blocking it. What am I thinking? That was like almost a hosel shot trying to avoid that. Um so I'm not going to be able to do it just because it's in the way. Hey, we tried, you know, kind of going on the fly, trying to do things for you guys. But let's go ahead and try to hit a shot now that's not basically almost a a hosel shot. So, 30 ft. I'm going to aim a little bit left. It takes off power, so I think that's going to be pretty good. Oh, yeah. It's going to be really good. And you can see that the chipping on this device, nice and soft. Um, it it works great. Honestly, it really works great. If I go into my menu, um, and if I were to change the external display to not mirror, then what it's going to do at this point, that's going to go full. I want to make sure you guys saw that. And then I'm going to have to grab my video again so I can demonstrate this for you guys because I can't record the same. Um, we'll just kind of get that set up again. Perfect. There we go. So now look what I'm looking at. I'm looking at a map. So if I wanted to aim somewhere else, I could aim somewhere else, hit the flag. If I wanted to drag the ball up here and give myself a let's call it a 12T putt or so, I can do that. If I want to go to settings and I want to go to view settings and I want to look at the impact video of that shot, I can do that. So there's that little chip trying to go under. Look at that. Right under the ball. I mean, that's pretty cool. Really cool. Look at that. Wow. Still a little towards the heel on that. So, too much talking and not paying enough paying attention to my little flop shot there. Um, that's that's really cool stuff. And you can also go to ball impact, of course, and it's just going to show you all of your data. You can show your uh you know, your club data if you're doing club data as well. So, let's go ahead and go back to external display. go back to mirror and then hit done. We will stop our recording. So now what I'm going to do and you can see that the hitting zone for putting is nice and large. So it's the same thing as ball only. And I noticed I was on club at one point and it automatically defaults to this for putting. Your putting zone is going to be that big. So, I'm ready to hit this is And you know what? I don't think that I am on the green. So, let's move this a little bit. What am I going to do here? How's that? Is that putting now? About 12. This is the only thing with On-course Practice that we're going to have to pay attention to. Um because it said 20%. And it might have been because I changed the display, went back, I was confusing it. So um I mean that's good. Feedback terms is not the end of the world. That's for sure. We're doing on-course practice. So um and this is about 12 ft. I have the stimp on 11 and it's a large break. So let's see how this works. I like how you can aim right in the sim. Did I drain it? Oh, it it was just too fast. It hit the lip because it was so downhill. You can see the the lines just kind of shooting downhill. If I would have hit that softer, um, that was that was perfect. Let's see. Let's see if we can do it again. All right. But you can aim right in your sim. That's what's nice. So, a little softer. That still rolled pretty hard. That one got it in there. Look at that. I got the putting down already on this. Um, so you can do on-course practice whether it be your drives, whether it be out on the fairway, whether it be chipping, whether it be putting. Um, and it does give you a lot of versatility, you know. So, I'm very interested in what you guys think. This was a first look review. You have to understand, I'm just like anyone else that has unboxed this unit and used it for the first time. You're seeing it all here within I don't know under an hour and a half or two hours pulling this thing out of the box. So, I like giving that just natural first look experience. And I want to hear what you guys think. As always, if you're shopping, looking around, you have questions, you want help, email me. It's it's always pinned at the top of the comments and put in the description. Um, please share any ideas you want as far as content with this device and I will dive in. I mean, obviously, I'm very busy. I'm always trying to do as much as I can for everyone. Um, but we will be doing a lot more content on this device, a ton. So stay tuned. There'll be a lot more coming
Build the rest of your sim
- Enclosure and screen$250 off at Shop Indoor GolfShop
- Carl's Place enclosure5% off, code sent by emailShopGet the code
- Hitting mat$20 off at Shop Indoor Golf. GSV5OFF is more on a first order over $400Shop
- Simulator computerSurfThing: $100 off applied automatically, no codeShop
- TouchscreenGSV code for TouchscreenGuruShop
- Complete package$250 off at Shop Indoor Golf. GSV5OFF is more on a first order over $5,000Shop
GSV earns a small commission on these links, at no extra cost to you. Shop Indoor Golf takes one code per order.