Garage Golf Simulator Builds: 9 Real Setups from Budget to Luxury
Jay has personally built, filmed, and reviewed nine garage golf simulator setups — from a $500 budget net build to an all-out luxury Carl's Place PRO enclosure with a ceiling-mounted ProTee VX. Every build is real. Every video is from Jay's own garage installs. Discount codes, affiliate links, and free planning available throughout.
The Garage Is the Most Popular Simulator Location — and for Good Reason
Garages give you the depth, width, and ceiling height that basements and spare rooms rarely offer. The floor takes punishment. The walls can handle a stray shot. And when you are done, you can close the door and it is out of the house. The catch is planning — ceiling height with door tracks factored in, depth from ball to screen, launch monitor choice relative to your room size, and climate control for year-round use. Jay has built and filmed nine distinct garage setups across every budget tier so you can see exactly what is possible in a real space before you spend a dollar.
☰ Jump to a Specific Build
- Budget Garage Build — The $500 Starting Point
- Shop Indoor Golf SIG10 — The Best All-Around Mid-Range
- Carl's Place DIY Kit — Updated Flush Bottom Screen
- SkyTrak Kit Garage Build
- Super Low Budget SIG Net & Screen Build
- GolfIN Simbooth — Complete Enclosure System
- ProTee VX + Carl's Place PRO — Ceiling Mounted
- TruGolf MultiSport 2.0 — Multi-Sport Add-On
- Ultimate Luxury Build — Carl's PRO + High End Everything
Every Garage Build Jay Has Filmed
Budget Garage Build
The original low-cost setup — great starting point with updated ideas for 2026.
▶ Watch This BuildSIG10 Garage Build
Shop Indoor Golf SIG10 enclosure with SkyTrak — the best all-around mid-range setup.
▶ Watch This BuildCarl's DIY Kit
Updated flush bottom screen build — best DIY enclosure and screen quality available.
▶ Watch This BuildSkyTrak Kit Build
Complete SkyTrak enclosure package — turnkey simulator, one purchase, ready to play.
▶ Watch This BuildSIG Net & Screen Build
Super low budget net and screen setup — get hitting for the least money possible.
▶ Watch This BuildGolfIN Simbooth
Complete self-contained enclosure system with a polished, finished look.
▶ Watch This BuildProTee VX + Carl's PRO
Overhead ceiling-mounted ProTee VX with Carl's Place PRO enclosure — no floor unit.
▶ Watch This BuildTruGolf MultiSport 2.0
Adds baseball, hockey, soccer & more to any garage build with the right dimensions.
▶ Watch This BuildUltimate Luxury Build
Jay's all-out Carl's PRO build — the ultimate garage golf simulator, no compromises.
▶ Watch This BuildPlanning Your Garage Simulator — What to Measure First
Get these numbers before you look at a single product. The wrong enclosure for your ceiling height or the wrong launch monitor for your room depth are the two most common expensive mistakes Jay sees. Measure twice, buy once.
Critical: Measure to the lowest point in the hitting zone — not the raw ceiling. Garage door tracks and openers typically reduce your effective height by 4 to 8 inches. A 9-foot ceiling with a standard door opener can effectively become 8 feet 4 inches — which limits your driver swing on taller builds.
Jay's Take: Email me before you buy anything. A 5-minute conversation about your room dimensions can save you hundreds of dollars in returns or modifications. I have seen every room shape and size and I can tell you immediately what will and will not work. It is completely free.
Ready to get started? Jay has discount codes for enclosures, launch monitors, and complete packages.
✉ Email Jay for Codes & DealsThe Original Budget Garage Simulator — and How Jay Would Do It Differently in 2026
This is Jay's original budget garage golf simulator build — one of the most-watched builds on the channel. The concept is simple: get a real launch monitor, a quality net or screen, and a hitting mat set up in your garage for the lowest possible cost so you can start hitting real shots immediately. The video still holds up as a great example of a low-cost easy setup.
But 2026 changes the picture significantly. Here is how Jay would approach the same budget build today:
What Jay Would Do Differently in 2026: Higher quality short throw projectors are now available at significantly lower prices than when this video was made. Budget impact screens have improved and there are more package deal options that bundle a net or screen with a mat for less than buying components separately. The launch monitor landscape has also improved at the budget tier — the Square Golf HE at $699 delivers camera-based tracking that simply did not exist at this price when this video was filmed, and the Garmin R10 at ~$500 is a legitimate radar option that works outdoors too. The fundamental concept of the build is still right — what goes inside it just has better options now.
- Consider the Square Golf HE as the launch monitor — camera-based at $699, full sim + putting, free GSPro connector
- Or the Garmin R10 at ~$500 if you also want outdoor range use
- Budget short-throw projectors from BenQ and Optoma are now under $600 with better specs than equivalents from 2-3 years ago
- Look at impact screen and net package deals from Shop Indoor Golf — bundle pricing often beats component buying
- A simple Carl's Place DIY kit transforms the same budget build into a proper enclosure
Budget Build — Jay's Recommended Launch Monitors for 2026
Use code GSVSQUARE at Square Golf for 5% off the HE. For R10 bundle packages use code GSV250 or GSVBUDGET at Shop Indoor Golf. Email Jay for current best pricing on a complete budget build.
Shop Indoor Golf SIG10 Enclosure — The Best All-Around Mid-Range Garage Setup
The Shop Indoor Golf SIG10 enclosure is Jay's go-to recommendation for most serious garage builds. The 10-foot wide screen gives you genuine course play immersion, the enclosure contains errant shots and focuses your space, and the SIG series build quality is excellent for the price. Jay used the SkyTrak ST+ in this build — everything in this section applies equally to the current ST MAX which is the updated version.
The SIG10 is a 10-foot wide by 10-foot tall enclosure that fits most standard garages. It goes up without professional installation and the aluminum frame is solid enough for permanent installation. Combined with a SkyTrak ST MAX or similar launch monitor at the side of the ball, this build works in tighter garage spaces that would struggle with a radar unit requiring more depth behind the golfer.
- SIG10 enclosure — 10 ft wide, push-button aluminum frame, fits most single-car garages
- Compatible with SkyTrak ST MAX, Foresight GC3, Bushnell Launch Pro, and other side-mounted units
- Impact screen rated for repeated use — no ball rebound safety issues
- Use code GSV250 at Shop Indoor Golf for savings on the enclosure and packages
- SkyTrak ST MAX: use code GOLFSIMULATORVIDEOS for the best available pricing
SIG10 Build — Shop Indoor Golf Enclosures + SkyTrak ST MAX
Use code GSV250 on enclosures and packages at Shop Indoor Golf. Use code GOLFSIMULATORVIDEOS on the SkyTrak ST MAX. Email Jay for a complete SIG10 build consultation and the best current bundle pricing.
Carl's Place DIY Kit — Updated Flush Bottom Screen Build
This is Jay's updated Carl's Place DIY kit build featuring the new flush bottom screen — a significant improvement over the earlier version. The flush bottom eliminates the gap at the base of the screen that the original design had, giving you a cleaner look and better containment for low shots and chips. Carl's Place is known for some of the best screen material available at any price point, and the DIY kit brings that quality into a self-assembled frame system.
The Carl's Place DIY kit is ideal for garage builders who want to customize their frame size to match their specific space rather than buying a fixed-size enclosure. You select the frame dimensions, screen material, and side panel configuration based on your garage measurements. Carl's offers a genuine discount to GSV viewers — email Jay for the code.
- New flush bottom screen — cleaner look, better low shot containment
- Best screen material quality in the DIY category — Carl's is the industry standard
- Custom frame sizing — configure to your specific garage dimensions
- Works with any side-mounted launch monitor (SkyTrak, Mevo Gen 2, GC3, etc.)
- Email Jay for the Carl's Place discount code — not available publicly
Carl's Place DIY — Email Jay for the Exclusive Discount Code
The Carl's Place discount code for GSV viewers is available by emailing Jay directly. He can also help you choose the right screen size and frame configuration for your specific garage dimensions.
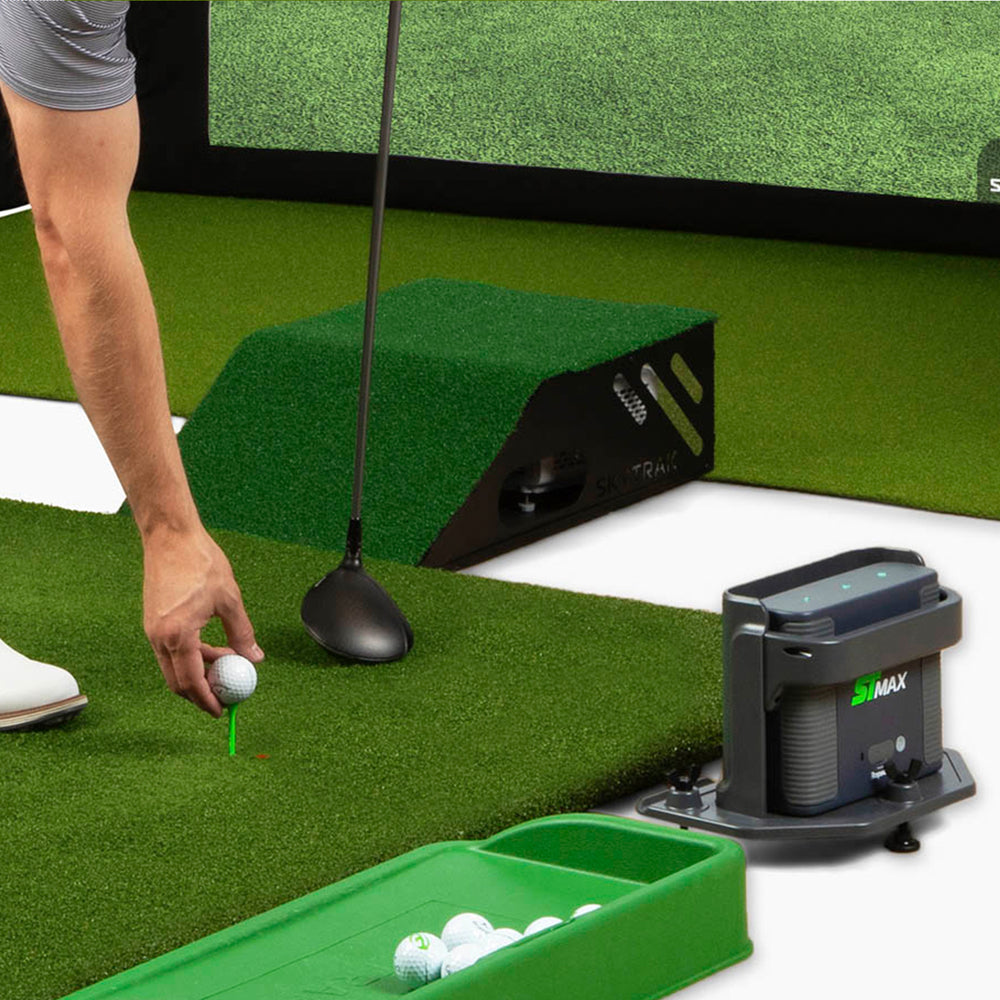
SkyTrak Kit Garage Build — Complete Turnkey Simulator Package
The SkyTrak kit package is the cleanest path to a complete garage simulator for someone who does not want to source components separately. SkyTrak's complete packages bundle the ST MAX launch monitor with an enclosure, impact screen, hitting mat, and in some configurations a projector — everything arrives matched and ready to assemble. Jay covers the full kit build in this video, showing exactly what arrives, how it goes together, and what the finished product looks like in a real garage.
The SkyTrak ST MAX is the current version — an upgrade over the ST+ with improved processing and Speed Training data from GOLFTEC. The photometric camera-based tracking works in tighter garage spaces since the unit sits beside the ball rather than behind it, eliminating the depth-behind-the-golfer requirement that radar units need.
- Complete turnkey package — one purchase, everything matched
- SkyTrak ST MAX — photometric camera, 20+ data parameters, no special balls required
- Side-mounted unit — works in tighter garages than radar alternatives
- GOLFTEC Speed Training data included with ST MAX
- Official E6 Connect and GSPro compatibility
- Note: SkyTrak requires a software subscription for full sim features
SkyTrak ST MAX — Code GOLFSIMULATORVIDEOS
Use code GOLFSIMULATORVIDEOS at SkyTrak.com for the best available pricing on the ST MAX and complete kit packages. Email Jay for help choosing the right SkyTrak package for your specific garage dimensions.
Super Low Budget SIG Net & Screen Build — Minimal Cost, Maximum Shots
Sometimes you just want to get hitting for the least money possible. This build uses a Shop Indoor Golf SIG net and screen setup at the lowest cost tier — no full enclosure, no side panels, just a quality impact screen in a frame that lets you practice real shots in your garage. It is ideal for first builds, temporary setups, renters who cannot permanently install anything, or golfers who want to validate that sim practice works for them before committing to a full enclosure build.
The SIG net and screen options from Shop Indoor Golf are well-made for the price. Pair this with a Square HE or Garmin R10 and a cheap mat and you are hitting real shots for under $1,500 total with no compromises on the data quality.
- Lowest possible cost for a real impact screen setup
- No permanent installation required — great for renters
- Shop Indoor Golf SIG net and screen — solid quality at the price
- Pair with Square HE or Garmin R10 for a complete sub-$1,500 sim
- Upgradeable — add side panels or a full enclosure frame later
- Use code GSV250 at Shop Indoor Golf for savings
SIG Net & Screen — Shop Indoor Golf Enclosures
Use code GSV250 or GSVBUDGET at Shop Indoor Golf on net and screen packages. Add a Square HE with code GSVSQUARE or an R10 bundle for a complete low-budget garage sim.
GolfIN Simbooth — A Complete Enclosure System with Great Aesthetics
The GolfIN Simbooth is a self-contained enclosure system that stands out from typical DIY builds with its clean, finished aesthetic. Where most enclosures are frame-and-screen setups that look like construction, the Simbooth is designed to look like a finished product when assembled — which matters if your garage is shared space or if aesthetics are part of your build goals.
Jay built and filmed a complete Simbooth garage installation. It works with multiple launch monitor configurations and delivers a professional-looking result without professional installation costs. Jay has exclusive discount access for GSV viewers — use code GSV250 at SimBooth.com or email Jay for a free consultation and to discuss additional package discounts.
- Self-contained enclosure — looks finished, not like a DIY project
- Professional aesthetic — ideal for shared garage or visible space
- Compatible with multiple launch monitor configurations
- Use code GSV250 at SimBooth.com for savings
- Email Jay for free consultation and additional package discounts
GolfIN Simbooth — Code GSV250 at SimBooth.com
Use code GSV250 at SimBooth.com for savings on the Simbooth enclosure system. Email Jay for a free consultation on whether the Simbooth is right for your garage dimensions and launch monitor preference — he can also discuss additional package deals.
ProTee VX + Carl's Place PRO — Overhead Ceiling-Mounted Premium Build
This build steps into premium territory with two of the best components in their respective categories: the ProTee VX overhead launch monitor and the Carl's Place PRO enclosure. The ProTee VX mounts to the ceiling above the hitting zone — eliminating any unit behind or beside the golfer and giving you a completely clear hitting space. Combined with the Carl's PRO enclosure, which is a significant step up in build quality and screen size from the DIY kit, this is a build that will last for years without feeling like a compromise.
Overhead ceiling mounting requires at least 10 feet of clearance at the mounting point — measure carefully before considering this build. Jay covers the full installation process in the video. For ProTee VX pricing and package deals, email Jay directly for a consultation — he works with trusted partners to put together custom packages.
- ProTee VX — overhead ceiling-mounted, completely clear hitting zone
- Carl's Place PRO enclosure — premium screen material, professional build quality
- Overhead mount requires 10+ ft ceiling clearance
- ProTee VX: email Jay for free consultation and package pricing
- Carl's Place PRO: email Jay for the exclusive GSV discount code
- GolfCore software launching 2026 — major new platform for ProTee
ProTee VX + Carl's PRO — Email Jay for Custom Package Pricing
ProTee VX package deals and the Carl's Place PRO discount code are both available by emailing Jay. He works with trusted partners to put together complete ProTee + enclosure packages at pricing you will not find publicly. Free consultation included.
TruGolf MultiSport 2.0 — The Best Multi-Sport Add-On for Any Garage Build
The TruGolf MultiSport 2.0 is the add-on that turns a golf simulator garage into a year-round multi-sport entertainment center. Beyond golf, the MultiSport 2.0 adds sports like baseball, hockey, soccer, football, archery, and more to your existing simulator setup. If your garage has extra width or depth, or if other family members are not golfers, this is one of the highest-impact additions you can make to any garage simulator build.
Jay covers the full MultiSport 2.0 build and sport mode demonstrations in this video. It is designed to work alongside most existing enclosure configurations. For pricing and availability, email Jay for a free consultation — TruGolf packages are available through Jay's partner network.
- Adds baseball, hockey, soccer, football, archery, and more to your simulator
- Works with most existing enclosure configurations
- Ideal if your garage has extra space or if other family members want to use the sim
- TruGolf software library continues to grow
- Email Jay for pricing, availability, and package options
TruGolf MultiSport 2.0 — Email Jay for Pricing and Packages
TruGolf MultiSport pricing and package options are available through Jay's consultation. Email him with your current simulator setup or planned build and he will advise on whether and how the MultiSport 2.0 integrates with your configuration.
The Ultimate Luxury Garage Golf Simulator — Carl's PRO + High-End Everything
This is Jay's ultimate garage golf simulator build — no compromises, no cutting corners, just the best possible setup from screen to launch monitor to lighting. The Carl's Place PRO enclosure is the foundation: a significant step above the DIY kit in screen size, material quality, frame construction, and overall finished appearance. Combined with a top-tier launch monitor, high-lumen short-throw projector, premium hitting mat, and proper lighting and climate control, this build is what most serious golfers are working toward.
Jay went all out on this one. Every component decision was made for maximum performance and longevity rather than cost. The video covers every element of the build from planning to final setup. If you want to build something like this, email Jay — this is exactly the kind of project he loves to consult on and he can help you spec every component and get the best available pricing through his partner network.
- Carl's Place PRO enclosure — the best DIY enclosure material and construction available
- High-end launch monitor — overhead or side-mounted depending on ceiling height
- High-lumen short-throw projector — 4K or 1080p laser depending on budget
- Premium hitting mat — realistic feel, durable for daily use
- Proper lighting, climate control, and cable management
- Carl's PRO discount code available by emailing Jay
- Full consultation available — Jay will spec the entire build for your space
Jay's Take: This is the build I would put in my own home with no budget limit. The Carl's PRO enclosure combined with a ceiling-mounted launch monitor is the combination that makes a garage feel like a real simulator facility rather than a garage with some equipment in it. If you are going to do it, do it right the first time — it is almost always cheaper than rebuilding.
Ultimate Build — Email Jay for Full Consultation and Pricing
The Carl's Place PRO discount code and complete ultimate build consultation are available by emailing Jay. He will help you spec every component for your specific garage dimensions and budget, and connect you with the best current pricing through his partner network. No obligation — just great advice.
Every build on this page has discount codes available. Email Jay to make sure you are getting the best deal.
✉ Email Jay for Best PricingGarage Golf Simulator Build Comparison — All 9 Setups
| Build | Budget Range | Enclosure Type | Launch Monitor Shown | Min Ceiling | Min Depth | Discount Available |
|---|---|---|---|---|---|---|
| 1. Budget Build | Under $1,500 | Net or basic screen | Square HE / R10 (updated) | 8.5 ft | 12 ft | ✓ GSV250, GSVSQUARE |
| 2. SIG10 Build | $3,000–$6,000 | Shop Indoor Golf SIG10 | SkyTrak ST+ / ST MAX | 9 ft | 15 ft | ✓ GSV250, GOLFSIMULATORVIDEOS |
| 3. Carl's DIY Kit | $2,500–$5,000 | Carl's Place DIY | Any side-mounted unit | 9 ft | 15 ft | ✓ Email Jay for code |
| 4. SkyTrak Kit | $4,000–$7,000 | SkyTrak package enclosure | SkyTrak ST MAX | 9 ft | 15 ft | ✓ GOLFSIMULATORVIDEOS |
| 5. SIG Net Build | Under $800 structure | SIG net + screen | Any unit | 8.5 ft | 12 ft | ✓ GSV250, GSVBUDGET |
| 6. GolfIN Simbooth | Mid-range | GolfIN Simbooth system | Multiple options | 9 ft | 15 ft | ✓ GSV250 / Email Jay |
| 7. ProTee VX + Carl's PRO | $8,000–$15,000 | Carl's Place PRO | ProTee VX (overhead) | 10 ft | 18 ft | ✓ Email Jay for both |
| 8. TruGolf MultiSport | Add-on | Works with most | TruGolf MultiSport 2.0 | 9 ft | 15 ft | ✓ Email Jay |
| 9. Ultimate Luxury | $15,000+ | Carl's Place PRO | High-end overhead or side | 10 ft | 18 ft | ✓ Email Jay for all codes |
Jay's Discount Codes for Garage Simulator Builds
Use these codes when purchasing. For Carl's Place, ProTee VX, TruGolf MultiSport, and custom packages, email Jay directly — those discounts are not publicly available.
📦 Shop Indoor Golf — Enclosures & Bundles
Code GSV250 or GSVBUDGET
shopindoorgolf.com
⚾ SkyTrak ST MAX
Code GOLFSIMULATORVIDEOS
skytrak.com
⛶ Square Golf HE
Code GSVSQUARE (5% off)
squaregolf.com
🏅 GolfIN Simbooth
Code GSV250
SimBooth.com
📩 Carl's Place DIY & PRO
Email Jay for exclusive code
a98cr125@gmail.com
📩 ProTee VX Packages
Email Jay for free consultation & deals
a98cr125@gmail.com
📩 TruGolf MultiSport 2.0
Email Jay for pricing & availability
a98cr125@gmail.com
📩 Not Sure Which Build?
Email Jay for a free planning consultation — no obligation
a98cr125@gmail.com
Garage Golf Simulator FAQ
What is the minimum ceiling height for a garage golf simulator?
Most golfers need at least 9 feet of clearance in the hitting zone to swing a driver comfortably. If your ceiling is 8.5 feet you may be able to swing shorter clubs but driver practice will be limited for most players. Critically, measure to the lowest obstruction in the hitting zone — not the raw ceiling height. Garage door tracks and openers typically reduce effective height by 4 to 8 inches. Email Jay with your exact dimensions and he can tell you immediately what will and will not work.
How much depth do I need for a garage golf simulator?
Minimum workable depth is around 15 feet total from the back wall to the screen. This gives you enough room for the enclosure, hitting zone, and a few feet behind the golfer. 18 feet is comfortable for most setups. If you are using a radar launch monitor that sits behind the ball, add the required unit-to-ball distance (usually 7 to 8 feet) plus the ball-to-screen distance (minimum 10 feet) plus space behind the tee for the unit itself. Camera-based units like SkyTrak and Square HE sit beside the ball and eliminate the depth-behind-golfer requirement, making them better choices for tighter spaces.
Should I use a radar or camera-based launch monitor in my garage?
For most garage builds, camera-based units are the better choice. Units like the SkyTrak ST MAX, Foresight GC3, and Square HE sit beside the ball and do not require significant depth behind the golfer. Radar units like the Garmin R10 and Mevo Gen 2 sit behind the ball and need 7 to 8 feet from the unit to the ball, plus whatever space is behind the tee. In a 15-foot garage that math gets tight. The exception is overhead ceiling-mounted units like the ProTee VX and Uneekor EYE XO2, which eliminate the behind-golfer requirement entirely and are the cleanest solution for well-designed permanent builds.
Do I need climate control for a year-round garage simulator?
Yes if you want to use it year-round. A garage without climate control will be too cold to practice in winter and too hot in summer in most US climates. A ductless mini-split is the most common and practical solution — units like the MrCool DIY in the 12,000 BTU range handle a standard single-car garage well. Insulate the garage door and walls first for best efficiency. Without insulation the mini-split will work harder and your energy bills will be higher.
What projector should I use for a garage golf simulator?
Short-throw projectors are required for most garage builds. Standard-throw projectors require 14 to 20 feet from the screen and will end up in your swing path at a typical ceiling mount position. Look for a throw ratio of 0.69 to 0.89 for a 10-foot screen at ceiling mount height. Minimum 3,000 lumens for a garage you cannot fully darken. BenQ and Optoma both make excellent options for garage simulator use. Email Jay for current projector recommendations as this category updates frequently.
How do I get Jay's discount codes for Carl's Place?
The Carl's Place discount code for GSV viewers is available by emailing Jay directly at a98cr125@gmail.com. It is not posted publicly. Include your planned build and garage dimensions and Jay can also advise on the right Carl's product (DIY kit vs PRO enclosure) for your space.
Which garage build does Jay recommend for most people?
For most serious golfers with a standard garage (9-foot ceiling, 15+ feet of depth), the Shop Indoor Golf SIG10 enclosure paired with a SkyTrak ST MAX or Mevo Gen 2 is the best all-around recommendation. It is a proper sim setup that will last for years, the components are well-matched, and Jay has discount codes for both. For golfers who want the absolute best and have the ceiling height for it, the Carl's PRO enclosure with a ceiling-mounted overhead launch monitor is the build to aspire to. Email Jay and he will tell you which one makes sense for your specific situation.
Ready to Build Your Garage Golf Simulator?
Jay has built nine garage setups across every budget. He can help you figure out exactly which build fits your space, your goals, and your budget — and make sure you get every available discount along the way.
✉ Email Jay — Free Consultation → Shop Indoor Golf Enclosures — Code GSV250 → SkyTrak ST MAX — Code GOLFSIMULATORVIDEOS