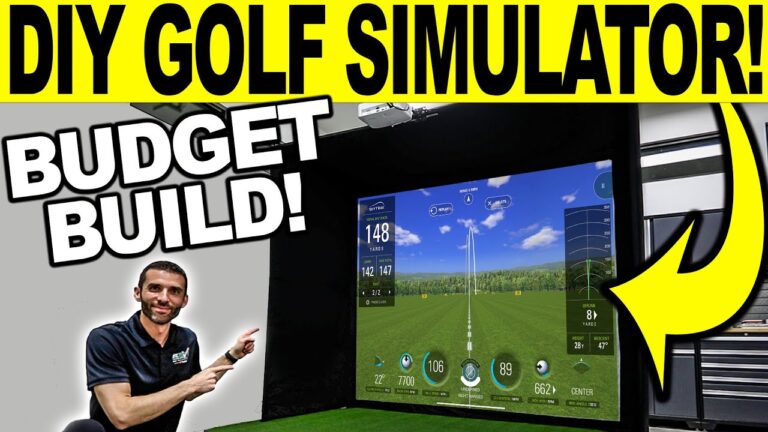
For golf enthusiasts, having the ability to practice your swing from the comfort of your own home is a dream come true. With advancements in technology, building a DIY home golf simulator has become a feasible and rewarding project. Whether you’re a weekend warrior or an aspiring pro, creating a golf simulator at home can help you improve your skills year-round. This guide will walk you through the process of budgeting, planning, and building your very own golf sanctuary. I can provide many links and discount codes to help save you on pretty much anything on the market, contact me anytime for help, it costs you nothing and helps support the channel!
1. Budgeting for Your Home Golf Simulator
Before diving into the technical aspects, it’s essential to set a budget. The cost of a DIY golf simulator can range widely, depending on the quality and features you’re aiming for.
Key Cost Areas:
- Launch Monitor/Simulator Software: $499 – $20,000
- Projector: $799 – $4,500
- Net, Impact Screen, or Enclosure: $800 – $3,500
- Mat and Turf: $500 – $2,500
- Computer/Tablet: $500 – $3,000
- Miscellaneous (Cables, Mounts, etc.): $50 – $200
By setting a clear budget, you can prioritize investments in the areas that matter most to you while avoiding unnecessary expenses. Keep in mind this is DIY, you can find a various level of each product that fits your specific needs whether that be entry level or high end.
2. Planning Your Home Golf Simulator
Space Requirements
To create an effective golf simulator, you need adequate space. Here are some general guidelines:
- Ceiling Height: At least 9ft, 10ft is optimal to swing comfortably and accommodate most ceiling mounted launch monitors.
- Width: A minimum of 10 feet for an offset setup, 15ft to allow for a comfortable playing environment with a center tee position.
- Depth: Around 15-25 feet to accommodate the simulator setup and swing area with 8ft-10ft ball to screen which can depend on bounce back safety, type of unit that may require more ball flight, and some units needing more distance unit to ball than others.
Choosing the Right Equipment
Launch Monitors and Simulators
The heart of any golf simulator is the launch monitor. Popular options include:
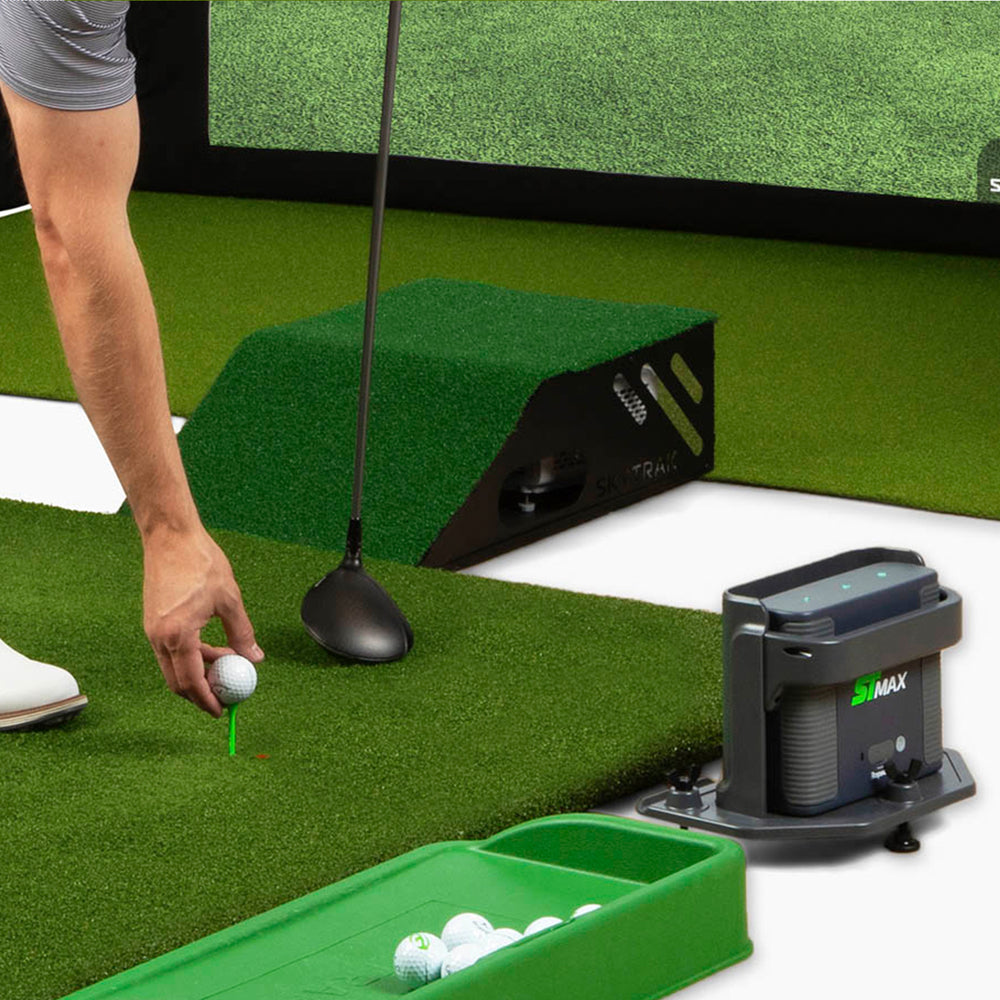
- SkyTrak: Known for ability to work in small spaces with good accuracy and affordability.
- TrackMan: Offers top-tier precision, software, and features, though it’s on the pricier side. Both Trackman 4 and Trackman iO provide club data without the use of club stickers.
- Flightscope MEVO+: Great for indoors or outdoors with a full D-Plan of Data. Requires specific setup to work it’s best. Buy direct and use code GSVMEVO+ to save!
- UNEEKOR: Various launch monitors like EYE XO, EYE MINI, and MINI LITE to appeal to built in or portable use. Known for their swing path video and impact image and being open to all software.
- Garmin R10: One of the lowest cost launch monitors on the market that has full ball flight and can be used indoors or outdoors. Struggles indoors sometimes on Spin Axis on certain shows just due to it not measuring spin axis. Does not offer putting.
- Rapsodo MLM2PRO: Great options under $1,000 that measures spin axis indoors using marked balls or outdoors can read flight using radar. Known for a HD Swing Path video and easy portability along with being able to tackle smaller space restrictions. Does not offer putting.
- Foresight Sports: Known for their top tier camera based launch monitors including GC3, GCQUAD, and the latest ceiling mounted Falcon. Club data does required stickers but is known to be some of the most accurate on the market.
Projectors and Screens
- Golf Simulator Projectors: Opt for a short-throw projector to minimize shadows and maximize image size.
- Impact Screens: Look for high-quality, durable screens that can withstand repeated impacts. Carl’s Place and Shop Indoor Golf offer reliable options.
Mats and Turf
A good hitting mat is crucial for a realistic feel. Consider brands like SIGPRO SOFTY, Fiberbuilt or TrueStrike for high-quality turf. Ensure the mat provides enough cushion to protect your joints during extended practice sessions. Watch this short video on the SIGPRO Softy to learn about my favorite mat! For your golf simulator turf that fills from your hitting mat to the screen you can look at the FiberBuilt Combo or just get the Money Put Golf Turf in the size you want which is my preferred choice!
3. Building Your Home Golf Simulator
Step-by-Step Instructions
- Prepare the Room:
- Clear the space and measure dimensions to ensure it meets the required specifications.
- Install adequate lighting to enhance visibility.
- Install the Impact Screen and Enclosure:
- Assemble the enclosure frame and attach the impact screen securely.
- Ensure the screen is taut to provide a clear and consistent image.
- Set Up the Projector:
- Mount the projector on the ceiling or a stand, aligning it with the center of the impact screen.
- Connect the projector to your computer or tablet and adjust the settings for the best image quality.
- Position the Hitting Mat:
- Place the mat in front of the impact screen, ensuring it’s aligned with the hitting area.
- Secure the mat to prevent slips during swings.
- Install and Configure the Launch Monitor:
- Follow the manufacturer’s instructions to set up the launch monitor.
- Connect the monitor to your computer or tablet and calibrate it according to the software requirements.
- Test and Fine-Tune:
- Conduct several test swings to ensure everything is working correctly.
- Adjust settings as needed for optimal performance and accuracy.
4. Enhancing Your Simulator Experience
Software
Investing in quality software can significantly enhance your golfing experience. Programs like TGC 2019 (The Golf Club) and E6 Connect offer realistic courses and detailed analytics to improve your game.
Accessories
Consider adding a few accessories to complete your setup:
- Side Netting: Protects walls and furniture from stray shots.
- Golf Club Rack: Keeps your clubs organized and within easy reach.
- Seating: Add comfortable seating for spectators or breaks between sessions.
5. Maintenance and Upgrades
Regular maintenance ensures long-term performance and enjoyment of your home golf simulator:
- Clean the Impact Screen: Regularly wipe down the screen to maintain clarity.
- Check Equipment: Periodically inspect cables, mounts, and the projector for wear and tear.
- Software Updates: Keep your software and firmware up-to-date to benefit from the latest features and improvements.
Conclusion
Building a DIY home golf simulator is a rewarding project for any golf enthusiast. By carefully budgeting, planning, and following the steps outlined above, you can create a personalized practice space that helps you refine your swing and enjoy the game year-round. Ready to get started? Begin by setting your budget and planning your space—your dream golf simulator is just a few steps away! Hit the contact me button below to reach out for special discount codes and more information to get started.