If you’re building a home golf simulator and shopping for a ceiling-mounted (overhead) golf launch monitor, the ProTee VX is one of the most compelling options in its price tier right now. In this hands-on ProTee VX review, I do a full unboxing, cover key specifications and what’s included, walk through ProTee Labs (calibration, settings, and swing cameras), then put it through real testing: full shots and shot shaping for spin verification in ProTee Labs, followed by GSPro short-game testing for chipping and putting.
This is a true first-look experience—installed, calibrated, and hit on-camera—so new buyers can see what ownership and setup actually look like.
Quick summary
The ProTee VX is built around a simple idea: give home simulator owners a robust overhead launch monitor with a large hitting zone, strong ball + club data, and a powerful practice environment in ProTee Labs, then let you jump into GSPro for full simulation play—especially short game—without making setup feel complicated.
In my first session, the installation and calibration process was straightforward, ProTee Labs was easy to learn quickly, and the system responded fast enough to feel natural for both practice and sim play. The real highlight is the workflow: practice in Labs, verify ball flight and spin behavior with shot shaping, then switch to GSPro for real chipping and putting.
ProTee background (why this launch monitor matters)
ProTee isn’t new to golf simulation. They’ve been in the space for decades and are deeply tied into the golf simulator ecosystem—both through software history and community involvement. The VX feels like a serious “all-in” entry into the modern overhead launch monitor market with a clear value target: keep the price competitive (in my video, the price discussed is $6,500) and focus on features and ongoing improvements instead of rotating discount cycles.
What’s included (unboxing)
In the box, you’re getting what you’d expect for an overhead system plus a few additions that matter for a home simulator buyer:
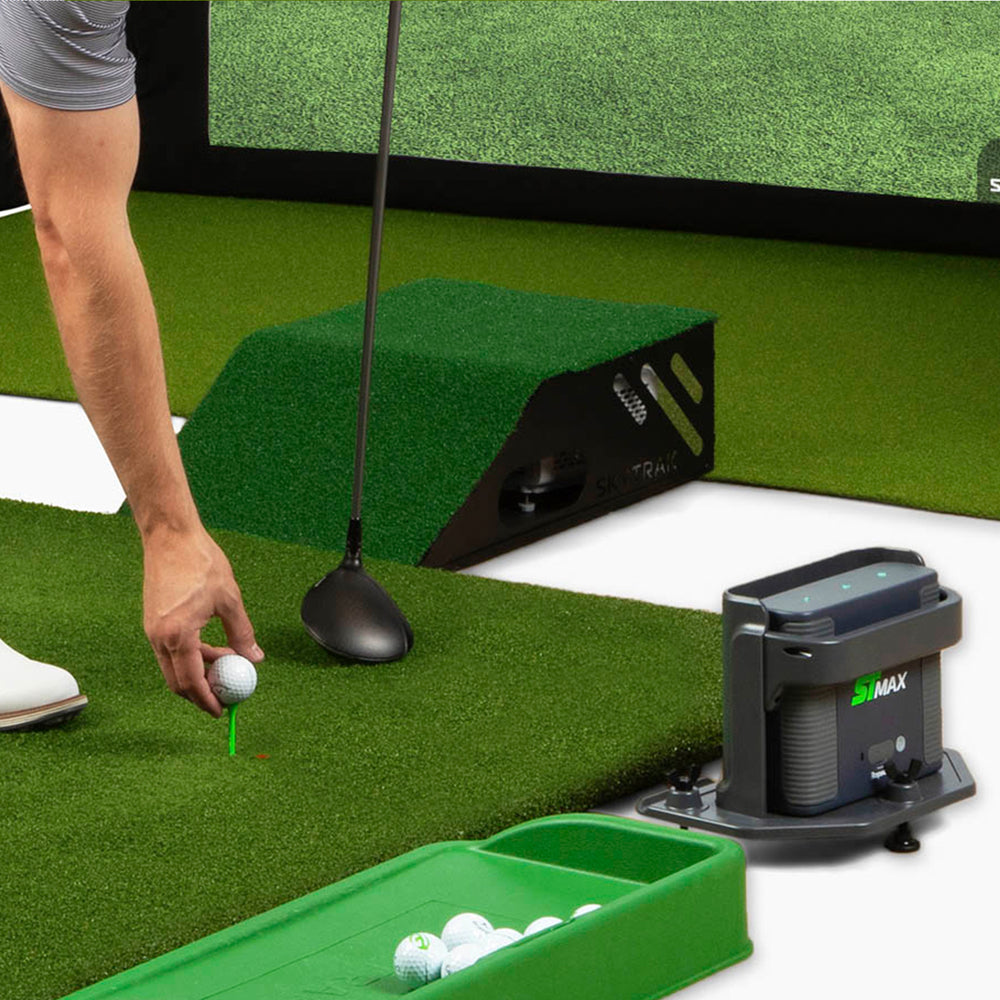
ProTee VX ceiling-mounted launch monitor (protected for shipping with camera/IR covers)
ProTee Labs software (included)
Calibration board (used for setup and recalibration)
Swing cameras (included in my unit)
Ethernet cable (VX connects via Ethernet)
USB 3.0 RJ45 gigabit dongle (useful if you need a second Ethernet option
Mounting hardware (anchors and screws)
Leveling dot / level tool (to ensure calibration board is level)
The packaging was solid, and the VX itself immediately feels like a premium, durable unit—heavy-duty casing with a professional “installed overhead” look.
Key ProTee VX specs covered in this review
Here are the practical highlights I call out in the video—specs that directly impact real home simulator installs:
Build and connections
Weight: about 20 lbs
Construction: robust, metal-like casing (built in Europe; ProTee is based in the Netherlands)
Connections: power input + Ethernet connection, with a physical power switch
Install height and positioning
Ideal ceiling height range: 9–10 ft
Approximate distance in front of the ball:
At 9 ft: about 3 ft 4 in in front of the ball
At 10 ft: about 3 ft 7 in in front of the ball
Hitting zone
Large hitting area: approximately 21 in x 25 in
This makes it easier to accommodate different mats, stance positions, and tee locations—especially in a real garage or home simulator where you may not always stand in the exact same spot.
Data provided (high level)
ProTee VX with ProTee Labs is designed to provide:
Ball data (speed, launch, spin-related metrics, flight)
Club data using AI-based tracking (no stickers), including items like club path, face angle, angle of attack, club speed, dynamic lie, and impact location visualization
Installation overview (real home simulator setup)
In this video, I mount the ProTee VX Launch Monitor in a home simulator environment using a crossbar-style enclosure mount. The big takeaways for new buyers:
Mounting overhead is clean and keeps the hitting area uncluttered.
It’s much easier if you treat it as a two-person job when lifting and aligning the unit.
Cable routing (power + Ethernet) can be the most time-consuming part if you want it to look clean.
Once mounted, the setup flow is simple: install software → enter license → place calibration board → calibrate → start hitting shots.
ProTee Labs software tour (what new buyers should know)
ProTee Labs is where the VX becomes more than “just a launch monitor.” It’s a full practice and analysis environment that’s designed to be both powerful and customizable.
Layout and key tabs
In my first walkthrough, ProTee Labs includes (and organizes) features across tabs like:
Swing (impact, club visuals, swing video, and data panels)
Range (range environment with shot list and data display controls)
Video (shot video, impact views, and replay tools)
History (session review and shot lists)
Custom dashboards (one of the best features)
You can unlock a layout, add visualizers (impact views, club path views, shot video, data blocks, heat maps, shot tables, etc.), resize them, and lock the page again. This is great for home users because you can build a screen that matches how you practice—whether you want “numbers-first,” “video-first,” or “club delivery-first.”
Swing cameras inside Labs
In this setup, swing cameras are visible inside the ProTee Labs interface, letting you review your swing along with the shot results. That’s a major value add for a home simulator, especially if you use the space for practice and not just playing rounds.

Calibration (fast and repeatable)
Calibration uses a board placed in the hitting zone. The key advantage is how easy it is to recalibrate later if you change:
hitting mat position
tee position
stance location
room layout
ProTee includes a small leveling tool so your calibration board isn’t tilted. In a real home build where mats and floors aren’t always perfectly level, that’s a smart addition.
First shots in ProTee Labs (initial impressions)
After installation and calibration, I hit my first shots in ProTee Labs and immediately started using the system the way a buyer actually would:
verify basic launch, carry, and flight
check impact location visuals
check replay tools to confirm strike quality
confirm responsiveness and shot delay
The system felt fast, and the range environment is genuinely enjoyable to practice in.
Shot shaping for spin verification (draws, fades, and intentional changes)
A big part of this review is shot shaping specifically to verify that spin behavior matches what I’m trying to do. This is one of the quickest ways to sanity-check a launch monitor, because intentional shot patterns should create predictable changes:
Fade / cut: ball starting left and moving right (or similar) with expected spin behavior
Draw: ball starting right and moving left (or similar) with expected spin behavior
Strike quality changes: slightly heavy vs crisp contact should show changes in spin and flight
In the video, I work through multiple shapes and pay attention to whether the numbers and ball flight behavior align with what I’m feeling in the strike. This is also a great “new buyer test plan” because it’s more meaningful than simply hitting ten straight shots and hoping the data “looks normal.”
Dimple spin update (beta) and what I noticed
During the software walkthrough and replay visuals, I call out that we’re running beta with dimple technology (full disclosure in the video). The replays and visual detail are impressive, and the direction ProTee is going with spin verification is clearly a major focus.
Because this is a first-look review, the takeaway is simple: the platform is actively evolving, and the tools for validating impact, strike, and spin behavior are becoming more advanced.
ProTee Labs settings (the features that matter most)
Before jumping to GSPro, I go into settings and highlight options new buyers care about:
Interface scaling and visualizer options
Club detection modes (AI options and performance tradeoffs)
Idle/sleep behavior
Update controls (stable vs beta)
Calibration controls
Practice/physics options like firmness and environment variables
Shot recording options (if you want sessions stored)
For a home simulator buyer, the main point is that Labs is not “a basic range.” It’s a flexible training environment with meaningful controls.
GSPro connection + short-game testing (chipping and putting)
To round out this ProTee VX review, I connect to GSPro and do the test that matters most for real sim play: short game.
Chipping tests
I run through:
chips from rough
low bump-and-runs
higher-launch chips
“bunker-style” / flop-style wedge shots
The response is quick, and the results feel usable in real simulation. I also like being able to pull up ProTee Labs replays and visualizers to validate certain odd or high-skill shots.
Putting tests
I test:
medium putts (speed + line feel)
short putts (3–6 feet), which some systems struggle with
intentional off-line hits to confirm detection and responsiveness
One very cool surprise is how much replay/analysis you can still access for putting inside Labs—useful if you want to work on face/path and consistency even in short putts.
Real-world note: static electricity (winter home sim rooms)
During the session, I had a noticeable static shock moment while moving around in a dry winter environment with ladders and equipment. If you’re installing electronics in a very dry home simulator space, static electricity is a real thing to take seriously.
Home simulator studio setup shown in the video
At the end, I show the real garage studio layout:
where the cameras are positioned (down-the-line and face-on)
how the unit integrates into the overall build
the PC setup being used to run Labs and GSPro
This helps new buyers visualize what a practical install looks like—not just a showroom diagram.
Frequently asked questions
Is this a full long-term review?
This is a first look review with real install and real hitting. More testing (driver sessions, long rounds, long-term stability, and deeper club data) is planned after more time on the unit.
Do I need stickers or marked balls?
In this review, the focus is on real use and validation through shot shaping and replay tools. Some users may still prefer marked balls for easier visual verification, especially when testing spin behavior, but the VX is designed to deliver club data without stickers.
Is the ProTee VX good for putting and chipping?
Short-game performance is one of the highlights I test in GSPro, and the VX handles very short putts and a variety of chip shots with fast response.
How hard is setup and calibration?
The flow is straightforward: mount the unit, route power and Ethernet, install software, enter the license, place the calibration board, calibrate, and start hitting. Recalibration is easy if you change the hitting zone.
Final thoughts
After unboxing, installation, calibration, ProTee Labs testing, shot shaping for spin verification, and GSPro short-game play, the ProTee VX made a strong first impression as a premium overhead launch monitor for a home golf simulator.
The hardware feels robust, the hitting zone is large and forgiving for real-life setups, and ProTee Labs is powerful enough that you can genuinely practice and analyze—not just hit shots at a basic range. The transition to GSPro for chipping and putting is the right way to show real-world sim play, and the responsiveness throughout the session feels fast and natural.
This is just the beginning, and there’s a lot more to test—especially deeper club data, driver sessions, and full rounds—but as a first-look install-and-hit review, the ProTee VX delivers exactly what new buyers want to see.
Watch the ProTee VX review video here: